How to Decorate a Wooden Urn | Creative & Personalized Ideas

Decorating a wooden urn can be a deeply personal and meaningful way to honor the memory of a loved one. Wooden urns, with their warm textures and natural elegance, provide a beautiful canvas for creativity. Whether you want a subtle, classic design or a more personalized, artistic expression, decorating a wooden urn allows you to create a lasting tribute that reflects the personality and spirit of the departed. In this guide, we’ll explore practical, creative, and heartfelt ways to decorate a wooden urn.
Understanding the Significance of Wooden Urns
Wooden urns are often chosen for their timeless beauty, durability, and natural appeal. They carry a sense of warmth and connection to nature, which makes them perfect for home display or memorial services. Beyond their material, wooden urns symbolize respect, love, and remembrance. Decorating them is more than a craft—it’s a way to celebrate a life and create a personal memorial that resonates emotionally with family and friends.
When you decorate a wooden urn, it’s essential to consider both aesthetics and the emotional value. Choosing the right style, theme, and elements can turn a simple urn into a cherished keepsake.
Materials and Tools Needed
Before starting your decoration, gather the necessary materials. Depending on the decoration method, you may need:
- Paints: Acrylic or water-based paints are ideal for wooden urns. They are safe, easy to work with, and dry quickly.
- Brushes and Sponges: Different sizes for detailed work or larger areas.
- Wood Stain or Varnish: To enhance the natural wood grain and protect the surface.
- Decoupage Supplies: Paper cutouts, glue, and sealant for adding images or decorative patterns.
- Engraving Tools: For carving names, dates, or meaningful symbols.
- Embellishments: Small gems, ribbons, or fabric pieces for additional personalization.
- Protective Gear: Gloves, masks, and a clean workspace to prevent dust and smudges.
Step-by-Step Guide to Decorating a Wooden Urn
1. Choose a Theme or Concept
Start by deciding on a theme or concept that reflects the personality of your loved one. Some popular ideas include:
- Nature-Inspired Themes: Leaves, flowers, or trees to symbolize life and growth.
- Hobby or Interest Themes: Music notes, sports symbols, or travel motifs to represent passions.
- Spiritual or Religious Symbols: Crosses, angels, or mandalas for those with religious beliefs.
- Minimalist Designs: Simple lines or patterns for a clean and elegant look.
Having a theme in mind makes the decoration process more cohesive and meaningful.
2. Prepare the Wooden Urn
Proper preparation ensures the decoration lasts and looks professional:
- Clean the Surface: Use a soft cloth to remove dust or residues.
- Sand the Wood: Light sanding helps paint or stain adhere better.
- Apply a Base Coat: Optional, depending on your chosen medium. A base coat can make colors pop or prepare the surface for decoupage.
3. Painting Techniques
Painting is a versatile way to decorate wooden urns. Techniques include:
- Hand Painting: Create custom patterns, flowers, or abstract designs using fine brushes.
- Stenciling: Use stencils to achieve precise shapes, names, or symbols.
- Layered Painting: Apply multiple layers of color or glazes for depth and texture.
For a natural wood look, consider highlighting the grain with translucent colors or stains rather than fully covering it with paint.
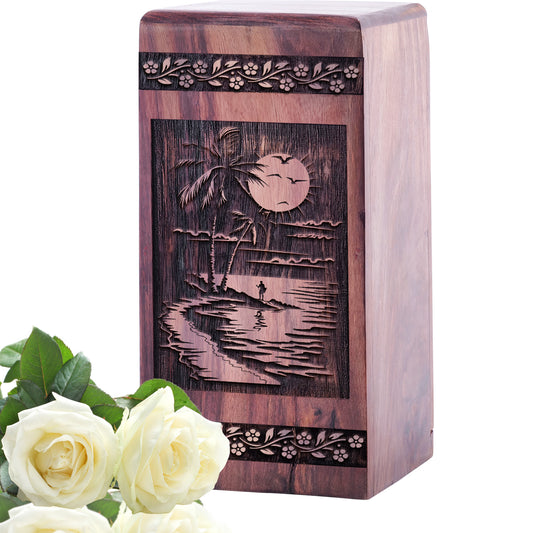
4. Decoupage and Photo Integration
Decoupage allows you to add photographs, meaningful quotes, or decorative paper to the wooden urn. Steps include:
- Select Images or Patterns: Choose items that hold sentimental value.
- Cut and Position: Trim to fit the urn surface.
- Apply Glue: Use decoupage medium to attach the images smoothly.
- Seal the Surface: Finish with a clear varnish to protect the design.
This method is excellent for incorporating memories and personal touches without permanently altering the wood.
5. Engraving and Wood Carving
Engraving is a timeless way to add permanent personalization:
- Names and Dates: Include the full name, birth, and passing dates.
- Symbols and Quotes: Small hearts, doves, or brief quotes can make the urn more meaningful.
- Carved Patterns: Decorative borders, vines, or abstract designs create a classic look.
Engraving may require professional assistance if intricate patterns are desired, but it adds elegance and durability.
6. Adding Embellishments
Small decorative elements can enhance the beauty of wooden urns:
- Ribbons and Fabric Wraps: Add a soft, tactile layer around the urn.
- Gemstones or Beads: Securely attach them to create sparkling accents.
- Miniature Ornaments: Personal tokens, charms, or tiny figurines can make the urn uniquely yours.
Ensure embellishments are securely fixed and do not compromise the urn’s integrity.
7. Protecting the Finished Urn
After decoration, protect your work with a clear sealant, varnish, or lacquer. This step preserves the colors, prevents fading, and ensures longevity. Depending on the finish, you may choose:
- Matte Finish: For a natural, understated look.
- Gloss Finish: To highlight colors and patterns.
- Satin Finish: A balance between shine and subtlety.
8. Placement and Display
Once decorated, the urn can be placed in a respectful and meaningful location:
- Home Memorials: Shelves, mantels, or display cabinets.
- Special Niches: In a memory room or dedicated space.
- Outdoor Memorials: Protected areas in a garden or columbarium.
Ensure it’s positioned away from direct sunlight or moisture to maintain the decoration’s integrity.
Tips for Meaningful Decoration
- Keep It Personal: Let the urn reflect the deceased’s personality or values.
- Balance Decoration and Simplicity: Avoid overcrowding the design. Sometimes subtle touches are more elegant.
- Use Safe Materials: Non-toxic paints and adhesives protect both the urn and your home.
- Plan Before Starting: Sketch ideas on paper to avoid mistakes.
- Seek Inspiration: Look at online galleries, memorial art, or other urn decoration examples.
Conclusion
Decorating a wooden urn is more than an artistic activity—it’s a way to honor and remember a loved one. With careful planning, thoughtful design, and meaningful personalization, your decorated wooden urn can become a cherished keepsake that celebrates a life well-lived. From painting and decoupage to engraving and embellishments, each technique offers a unique way to make a memorial special.
By investing time and care into decorating your wooden urn, you create a tangible symbol of love, memory, and respect that can be treasured for years to come. Whether displayed at home, in a memorial space, or in a garden, your wooden urn will serve as a lasting tribute, reflecting the life, spirit, and story of your loved one.
Read More -
How to Care for Your Wooden Urns: Tips for Lasting Preservation
Handmade vs. Machine-Made Wooden Urns: What’s the Difference?
What Are the Best Materials for Cremation Urns? A Guide to Durability, Meaning & Style